To many, the creative process is a mystery. You talk to an esoteric creative, they ask you questions that you don’t know the answer to (and judge you in the process), then they hide away in a cave for a while until they’ve finished your project.
I want to pull back the curtain a bit in an effort to help your creative projects go better. In order to help shed some light on what really happens, I want to breakdown an illustration project I had the pleasure to take on for Southwest Church.
Save yourself some time by downloading my Graphic Design Workflow as a starting point
Every project starts with a conversation.
The goal of the initial conversation is to define the project brief.
A good project brief answers these questions:
When are assets due?
What is the goal or win of the project?
Who is the single point of contact for questions and content?
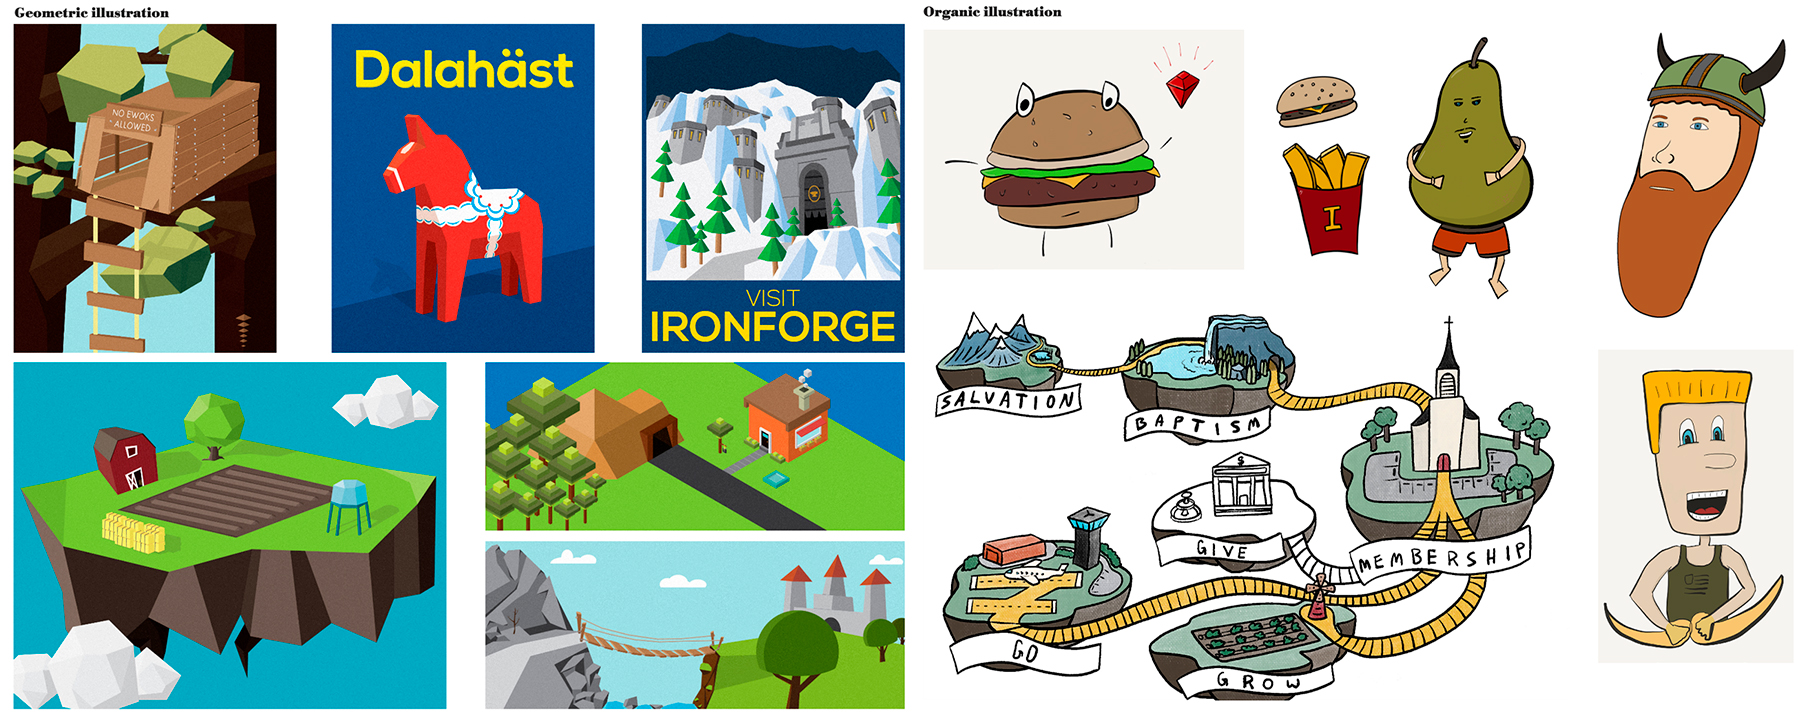
In the case of this project, the project brief was pretty straightforward. Southwest Church had a “summer road trip” series coming up, and they wanted to create a map for their series that could be shown on their LED wall. They brainstormed some destinations that they wanted to included, worked it up on a white board, took a photo, and sent it over for our conversation.
In addition to the drawing, they called out some of the different stops they wanted (one for each week of the five week series), as well as ideas for fun additional points of interest to make the map feel more realistic.
As is typically the case, I had a few questions about the project. That's why this is called the "let's chat" phase. Effective project briefs are the result of a conversation, not a form submission.
reduce unknowns for for everyone
It doesn’t matter if you are making a print piece, an illustration, or a feature film–the primary goal in the early stages of a creative project should be about reducing unknowns for both the creative and the client. While saying something like “we would love an illustration” does provides some direction, think about how many different styles of illustration there are! If you are expecting something that looks like Norman Rockwell and I create something that looks like it belongs on Cartoon Network, there would be some disappointment. Understandably so.
On the client side, the image sent to me by the client gave me some sense of what they envisioned, but it didn’t address some compositional problems I knew I would encounter in the project. Solving these visual problems would be critical to the final piece being a success. This should be expected by every creative–the client has a vision, but not a solution. If the client had the solution there wouldn’t be any point in hiring a creative! Alignment is key.
This is the point where many client/creative relationships begin to sour. If the creative doesn’t keep the client in the loop with their decisions–decisions that are critical to the success of the final piece–the end result could end being a major surprise to the client. On the other hand, if the creative just follows all the recommendations of the client, the piece won’t benefit from the creative’s involvement. By pushing hard toward artistic alignment, we were able to save time and enjoy each step of the process.
In order to make sure the client and I were aligned, I sent two different illustration styles that I though could accomplish their objectives. I also sent a (very) rough map layout that addressed any layout issues I could foresee.
This gave us the chance to discuss any differences of opinions we might have. Once everyone was on the same page here, I could get to work.
Clarity through exploration
Because this was a large illustration, it was important for me to bring the client into the illustration at key points. There’s nothing worse than getting to the end of a project and realizing that a simple change earlier in the process could have yielded a better piece.
I drew out a very rough layout of the different regions of the map. This was critical for me so could identify some of the compositional and perspective problems that would need to get solved. As you’ll see with the final map, many of the design decisions here made it to the final piece. If we had a major issue here, it would have taken a few minutes to make changes. If we waited until later in the process, it would have cost us hours.

I also included a very rough sketch of what some of the buildings could look like. This specific design didn’t make it to the final piece as the scale was much different than the sample, but it gave an accurate picture of the overall look and feel the map would have.
This phase takes a degree of imagination. For the client, it’s helpful to voice concerns if things don’t seem right or something isn’t easily understood. By bringing those things up, you help the creative bring clarity. For the creative, this is where specific issues that you anticipate need to be elevated. I asked if they were good with the points of interest I had chose. If they weren’t, I really wanted to know at this point.
Every step of the process is an opportunity for clarity and alignment.
Now, we create!
Because this project required a fairly quick turnaround, I knew I would be spending time on it over the weekend. While that was no problem on my end, it meant that I wouldn’t be able to get any answers to questions that came up in the process of creating, or get any feedback before a lot of work had been done. In order to try to get ahead of that as much as possible, I sent over a progress update showing where things were close to end of day on Friday.
This gave us a chance to calibrate one last time before the project was finished. Major changes at this point would have been pretty costly time wise, but not nearly as impactful as if I waited until the whole piece was completed.
Because the process had been followed and this wasn't the first check in, there weren't any revisions. This is an indicator that your process is working: changes decrees as the project moves along.
Sweat the details (because they matter)
At long last, the illustration was finished! Well, almost.
The launch phase is where the details really matter. While the bulk of the work has been done, some fine tuning was required in order to prepare the illustration for launch.
Following the submission of the final artwork, the piece was put up on the LED wall on stage to make sure what needed to be readable, was actually readable. We also changed the landmark signs from hand written to typed so the client could make changes on the fly incase any of the weekly titles got changed. Talk about thinking ahead!
These are the kinds of small tweaks at the end that really set everyone up for success.
Fill out a project inquiry form to start the conversation
Healthy creative ministry tools and resources delivered straight to your inbox twice a month.